Python SDK
Introduction
To understand how to use this SDK it is best to read the following documentation:
- Server Introduction
First read the Server Introduction to familiarize yourself with the various concepts. - Server API Reference
This Server SDK wraps the Server API and (amongst other things) exposes the responses of the webservice calls as Python objects. Understanding the Server API will help you understanding these SDK objects as well. - This current document will help you understand the global flow when interacting with the Worldline platform using the Python SDK.
The Python SDK helps you to communicate with the Server API. More specifically, it offers a fluent Python API that provides access to all the functionality of the RESTful Server API. Below, we discuss the following topics in detail.
- Initialization of the SDK
- Payments
- File Service support
- Idempotent requests
- Exceptions
- Logging
- Advanced use: Connection pooling
- Advanced use: Customization of the communication
- Webhooks
- Notes
The source code of the SDK is available on Github for Python 2 and Python 3 . There you can find installation instructions.
The API documentation of the latest version of the SDK is available for Python 2 and Python 3 . For a specific major version, replace latest with <major>.x. Note that this is only available for versions 4.x and later. For version 3.x use this URL for Python 2 and this URL for Python 3 instead.
Initialization of the Python SDK
All Python code snippets presented in the API reference assume you have initialized the Python SDK before using them in your Development Environment. This section details the initialization of the Python SDK.
Initializing is simple, and requires only one key task: use our Factory class to create an instance of Client, which contains the actual methods to communicate with the Server API.
The Factory needs the following input information to provide you with an initialized Client
- A String to the configuration file with your connection configuration.
- The secret_api_key and api_key_id. The secret_api_key is a key that is used to authenticate your API requests, and api_key_id identifies that key (as you can have multiple active keys). Both of these can be obtained from the Account Setup tab of the Configuration Center, and are available only if you are administrator.
The property file should contain the following keys:
[ConnectSDK]
connect.api.integrator=<your company name>
connect.api.endpoint.host=api.domain.com
connect.api.authorizationType=v1HMAC
connect.api.connectTimeout=5 # use -1 for no timeout
connect.api.socketTimeout=300 # use -1 for no timeout
connect.api.maxConnections=10 # to support 10 concurrent connections
We recommend to keep the timeout values at these values. See API endpoints for the possible hosts.
If a proxy should be used, the property file should additionally contain the following key(s) under the [ConnectSDK] section:
connect.api.proxy.uri=<URL to the proxy host including leading http:// or https://>
# omit the following two lines if no proxy authentication is required
connect.api.proxy.username=<username for the proxy>
connect.api.proxy.password=<password for the proxy>
You can create an instance of Client using the Factory with this code snippet:
client = Factory.create_client_from_file(configuration_file_name, "api_key_id", "secret_api_key")This Client instance offers connection pooling and can be reused for multiple concurrent API calls. Once it is no longer used it should be closed.
Client defines __enter__ and __exit__ methods, which allows it to be used in with statements.
Connection management
Connection pooling is configured with the max_connections setting in CommunicatorConfiguration or in the configuration file. Its value determines how many connections to the Server API are kept alive for re-use in a connection pool. If there are more requests in progress than this maximum number of connections, then a new connection will be temporarily opened.
Client meta information
Optionally, for BI and fraud prevention purposes, you can supply meta information about the client used by the customer. To do so, create a new instance of Client at the start of the customer's payment process as follows:
consumer_specific_client = client.with_client_meta_info("consumer specific JSON meta info")This consumer specific instance will use the same connection pool as the Client from which it was created. As a result, closing a Client will close all Client instances created using the with_client_meta_info method. There is no need to close those separately.
This closing works both ways. If a Client created using the with_client_meta_info method is closed this will also close the Client it originated from. This will in turn close all other Client instances created using the with_client_meta_info method. This can be used if only a Client with client meta info is needed.
Do not use this consumer specific instance for API calls for other consumers.
Example JSON meta information for a mobile app client:
X-GCS-ClientMetaInfo: {
    "platformIdentifier": "Android/4.4",
    "appIdentifier": "Example mobile app/1.1",
    "sdkIdentifier": "AndroidClientSDK/v1.2",
    "screenSize": "800x600",
    "deviceBrand": "Samsung",
    "deviceType": "GT9300",
    "ipAddress": "123.123.123.123"
}
Example JSON meta information for the JavaScript SDK running in a browser:
X-GCS-ClientMetaInfo: {
    "platformIdentifier": "Mozilla/5.0 (Linux; U; Android 4.1.1; en-gb; Build/KLP) AppleWebKit/534.30 (KHTML, like Gecko) Version/4.0 Safari/534.30",
    "sdkIdentifier": "JavaScriptClientSDK/v1.2",
    "screenSize": "800x600"
}
Payments
As a merchant, your core interaction with Worldline typically starts when your customer clicks the checkout button in your application. The payment process usually has the following steps:
- Payment Product selection
- Setting of available information needed for selected payment product (e.g. amount of the order)
- Collection of missing customer information needed for selected payment product (e.g. creditcard number)
- Submitting the payment request to the Worldline platform
- Handling the response to the payment request (e.g. payment unsuccessful)
The Worldline platform offers three ways of handling this payment process:
- Use a hosted payment through the MyCheckout hosted payment pages.
In this case, you redirect the customer to our hosted payment pages. For you as a merchant, this is the easiest option as the Worldline platform can handle payment product selection and is responsible for the collection of sensitive data like a creditcard number. Through our Configuration Center, you still have a lot of control over the look and feel of the checkout. - Use a Client SDK to build a payment flow for a native app or a JavaScript application.
In this case, your server requests the creation of a client session. This returns a session id with which your client application can communicate with the Worldline platform directly. Your client collects and then encrypts the required customer information. It then sends this encrypted information to your server, where you add all other relevant information and submit a payment request to the Worldline platform. - Use a Server SDK to build a payment flow hosted on your server.
In this case, you can use the Server SDK to obtain the payment products that are applicable to the payment, to obtain the fields that need to be collected from the customer for a selected payment product, and to submit the payment request itself.
In the next couple of paragraphs, we discuss each of these options in more detail.
Use a hosted payment through the MyCheckout hosted payment pages (RPP)
The high-level flow of a hosted payment is described below, followed by a more detailed look at each of the steps. 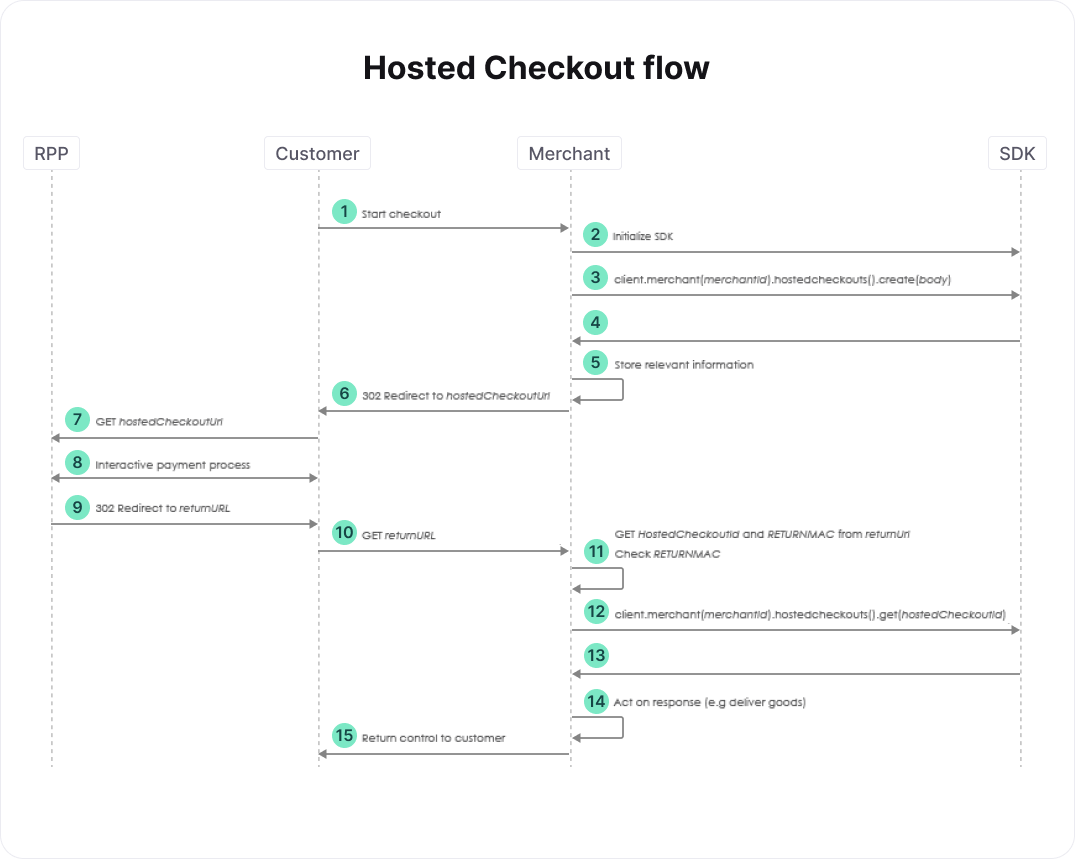
- At this point, your customer has provided all relevant information regarding the order, e.g. a shopping cart of items and a shipping address.
- See the section on initialization. Use Factory to create an instance of Client if you hadn't done so yet, and set the metadata that you've collected about the client of the customer.
- Create a CreateHostedCheckoutRequest body and populate at least its order. See the relevant section of the full API reference for more details. You can specify an optional return_url, which is used to redirect your customer back to your website in step 9.
- The create hosted checkout SDK call returns a CreateHostedCheckoutResponse response. Store the hosted_checkout_id and RETURNMAC it contains, as well as any other relevant order information. You will need these when your customer returns from our hosted payment pages, or when the customer fails to return in a reasonable amount of time. Now take response.partial_redirect_url and prepend "https://yoursubdomain" to it to create hosted_checkout_url, where yoursubdomain is an RPP subdomain you requested. You can find your subdomains in the Configuration Center's Payment Page Setup tab, under the Subdomain settings of your merchant. If you are logged in as an adminstrator, you can request a subdomain here as well.
- After completing the interactive payment process in the RPP, your customer is redirected back to the url you provided in step 3 as body.hosted_checkout_specific_input.return_url. The hosted_checkout_id and RETURNMAC you stored in step 5 are added to this URL as query parameters. Specifying a return_url is optional, however. As a result, your customer is only redirected back if you've provided a URL in step 3.
- If you cannot identify the customer based on e.g. the HTTP session, you can use the hosted_checkout_id for this purpose. If you do, you must check that the hosted_checkout_id and RETURNMAC from the return_url match those that you stored in step 3. Note that the RETURNMAC is used as a shared secret between the Worldline platform and your system that is specific for this hosted checkout.
- Retrieve the results of the customer's interaction with the Worldline platform.
- Check the GetHostedCheckoutResponse response returned in step 13. If response.status equals PAYMENT_CREATED, then the customer attempted a payment, the details of which can be found in response.created_payment_output. Depending on the payment product chosen and the status of the payment you can "deliver the goods" immediately, or set up a regular poll of the created payment to wait for the status. Such a poll is done using the SDK call client.v1().merchant("merchant_id").payments().get(payment_id), where payment_id is response.created_payment_output.payment.id. For details on the various payment products and their statuses, see Payment Products.
Additionally, it may be the case that the customer does not return in time (or at all), for example because the browser is closed or because you didn't provide a return_url. In this case, you need to retrieve the status of the hosted checkout (step 12) before the hosted checkout times out, which happens after 2 hours, and follow step 14 as well.
Use a Client SDK to build a payment flow for a native app or a JavaScript application
The high-level flow of a payment performed with a native app or a JavaScript application is described below, followed by a more detailed look at each of the steps. First, we discuss the flow for payment products that do not require a redirect to a payment method hosted by a third party. Afterwards, the flow for payment methods that require a redirect is described.
Although this flow uses the Client SDK, we won't go into the details of this SDK here. A detailed description is given in the documentation of the Client SDK. 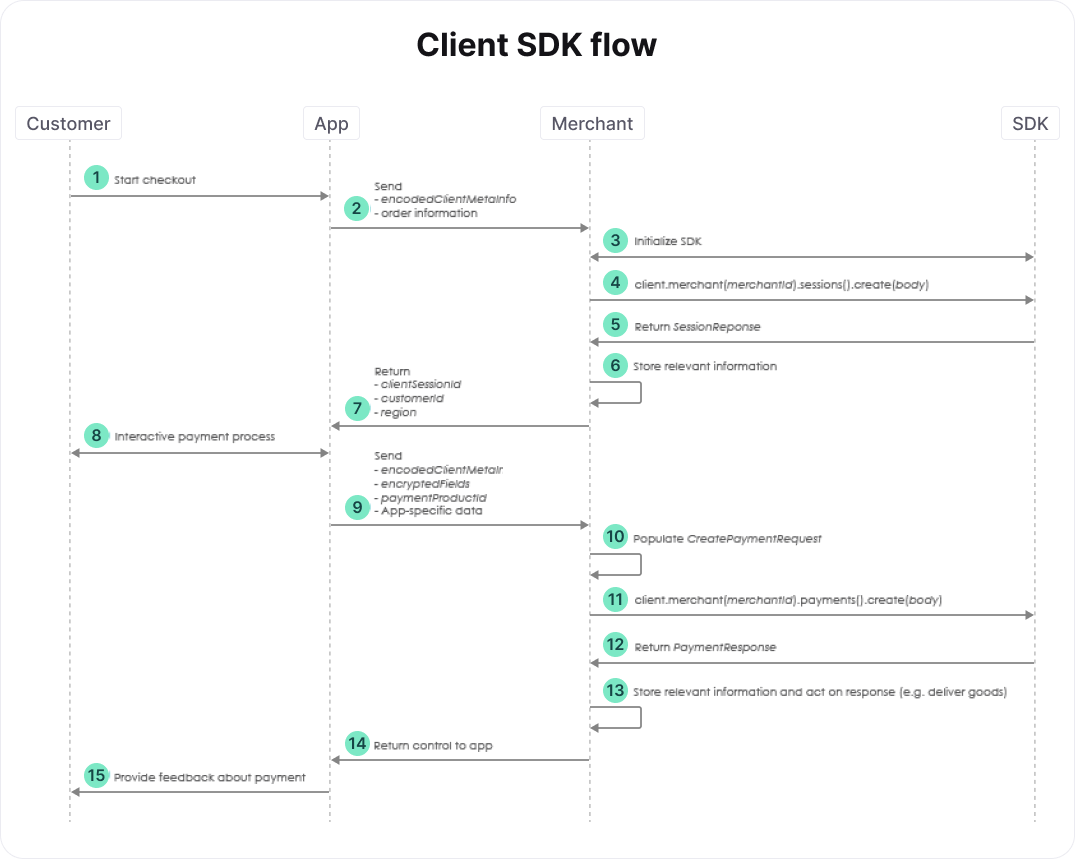
- At this point, your customer has provided all relevant information regarding the order, e.g. a shopping cart of items and a shipping address.
- The app sends the metadata about the client of the customer and the order information to your server.
- See the section on initialization. Use Factory to create an instance of Client if you hadn't done so yet, and set the metadata about the client of the customer provided in the previous step.
- Create a SessionRequest body and request a new session. By creating a session, you allow your consumer to communicate with our Client API via your app. See the relevant section of the full API reference for more details. Requesting a new session results in a SessionResponse response, which contains a client_session_id, customer_id, and a region. Store the relevant information to be able to link the order and customer to the payment.
- Send the client_session_id, customer_id, and region to the app. The Client SDK needs this information to interact with the Client API. As mentioned above, the documentation of the Client SDK provides additional details.
- Once the interactive payment process is finished, the app has to send the encodedClientMetaInfo, encryptedFields, and paymentProductId to your server. The encryptedFields contains confidential information about the payment request. Do not store it anywhere. Use the paymentProductId to determine which additional fields you need to provide in the payment request. Some of these fields may come from your app, so you can decide to send additional app-specific data to your server. For payments that require a redirect to a third party, for example, you could send a return URL as app-specific data. Note that for this flow, we assume that we're dealing with a payment that doesn't require a redirect.
- Create a CreatePaymentRequest body. Populate its encrypted_customer_input with the encryptedFields obtained from the app. Also populate its order. You may also want to populate the fraud_fields and the relevant PaymentMethodSpecificInput. To this end, you can map the payment_product_id obtained from the app to its payment method. For example, for a card payment, you can populate card_payment_method_specific_input to e.g. set a customer_reference or indicate that the payment is the first of a recurring sequence.
- Use the body you just created to perform a create payment request. See the relevant section of the full API reference for more details. The create payment SDK call returns a CreatePaymentResponse response. The status of the payment is accessible via response.payment.status. Depending on the payment product chosen and the status of the payment you can "deliver the goods" immediately, or set up a regular poll of the created payment to wait for the status. Such a poll is done using the SDK call client.v1().merchant("merchant_id").payments().get(payment_id), where payment_id is response.payment.id. For details on the various payment products and their statuses, see Payment Products.
The high-level flow of a payment performed with a native app or a JavaScript application is a little different if a redirect is involved. We only describe the steps that differ from the flow without a redirect. 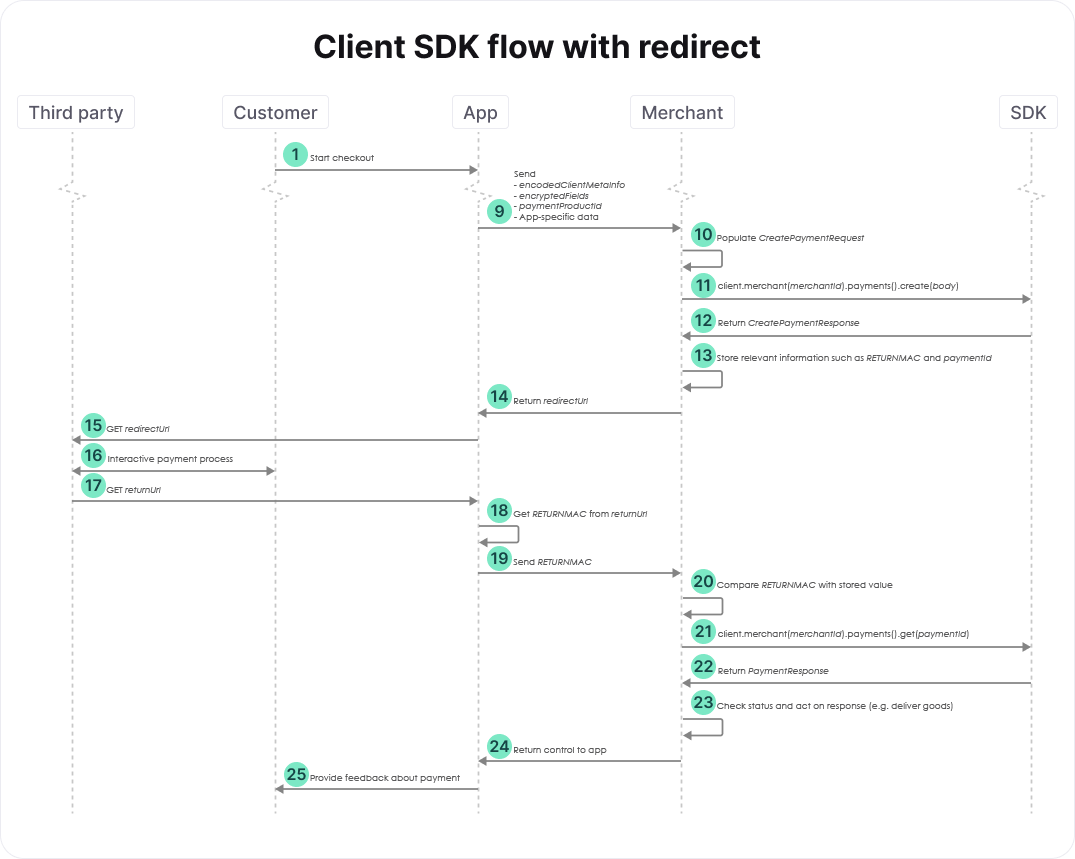
- The payment process shown in the diagram above involves a redirect of your customer. For this example, we assume that the app decides which return_url should be used, which is sent as part of the app-specific data. Your customer is redirected to this URL (i.e., is send back to your app) after completing the payment process. The paymentProductId can be used to determine whether we're dealing with a payment that involves a redirect.
- Create a CreatePaymentRequest body and populate its encrypted_customer_input and its order. Additionally, populate its redirect_payment_method_specific_input by providing at least the desired return_url. See the relevant section of the full API reference for more details.
- The create payment SDK call returns a CreatePaymentResponse response. For payments involving a redirect, response.merchant_action.redirect_data.redirect_url defines the URL to which the customer should be redirected to complete the payment. You need to store the value ofresponse.merchant_action.redirect_data.returnmac because it should be compared with theRETURNMAC returned by the app at a later stage. Additionally, you need to store the value ofresponse.payment.id. This payment_id is needed to check the status of the payment after the redirect.
- Send the redirect_url to your app so that it can redirect the customer to the payment page hosted by the third party.
- After the payment process is completed, your customer is redirected to the return_url specified previously. In the flow shown in the figure above, we assume that this URL brings the customer back to the app.
- The app should retrieve the RETURNMAC from the return_url and send it to your server.
- You can use the RETURNMAC to identify the customer by comparing it with the one stored previously, and to validate that the customer was redirected to you by our systems.
- Use the payment_id stored previously to check the status of the payment. See the relevant section of the full API reference for more details. The retrieve payment SDK call returns a PaymentResponse response. The status of the payment is accessible via response.payment.status. Use this status to handle the order appropriately, as described above.
Use a Server SDK to build a payment flow hosted on your server
The high-level flow of a payment performed from pages hosted on your server is described below, followed by a more detailed look at each of the steps. First, we describe the flow for payment products that do not require a redirect to a payment method hosted by a third party. Afterwards, the flow for payment methods that require a redirect is described. 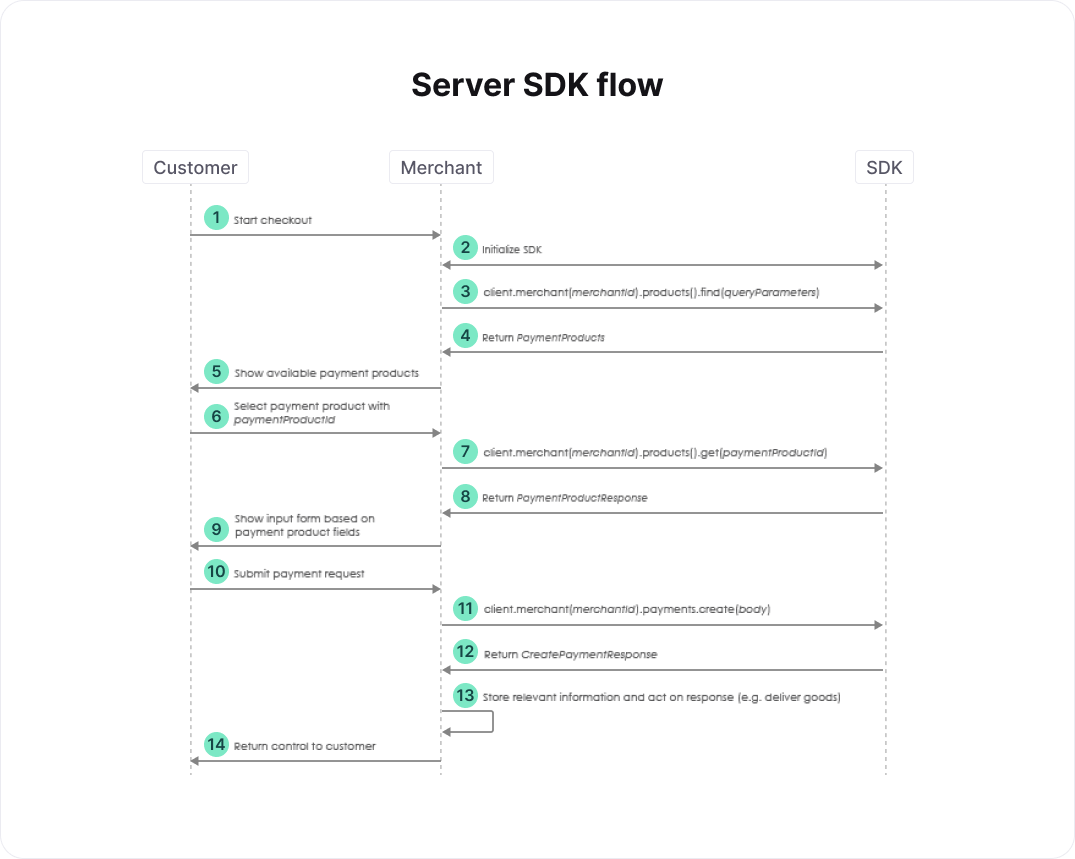
- At this point, your customer has provided all relevant information regarding the order, e.g. a shopping cart of items and a shipping address.
- See the section on initialization. Use Factory to create an instance of Client if you hadn't done so yet, and set the metadata that you've collected about the client of the customer.
- Create FindParams queryParams and request a list of relevant payment products. See the relevant section of the full API reference for more details.
- Show the relevant payment products to the customer such that he or she can select one.
- The customer selects one of available the payment products.
- Once the customer has decided which payment product should be used, you request the fields of this payment product. See the relevant section of the full API reference for more details.
- Based on the information retrieved in the previous step, you render a form that the customer can use to enter all relevant information for the selected payment product.
- The customer submits the form.
- Create a CreatePaymentRequest body, populate its order and other properties depending on the selected payment product, and submit it. See the relevant section of the full API reference for more details. Do not store the information provided by the customer. The payment_product_id can be used to determine whether this payment involves a redirect to a third party. For this flow, we assume that we're dealing with a payment that doesn't require a redirect.
- The create payment SDK call returns a CreatePaymentResponse response. The status of the payment is accessible via response.payment.status. Depending on the payment product chosen and the status of the payment you can "deliver the goods" immediately, or set up a regular poll of the created payment to wait for the status. Such a poll is done using the SDK call client.v1().merchant("merchantId").payments().get(payment_id), where paymentId is response.payment.id. For details on the various payment products and their statuses, see Payment Products.
The high-level flow of a payment performed from pages on your server is a little different if a redirect is involved. We only describe the steps that differ from the flow without a redirect. 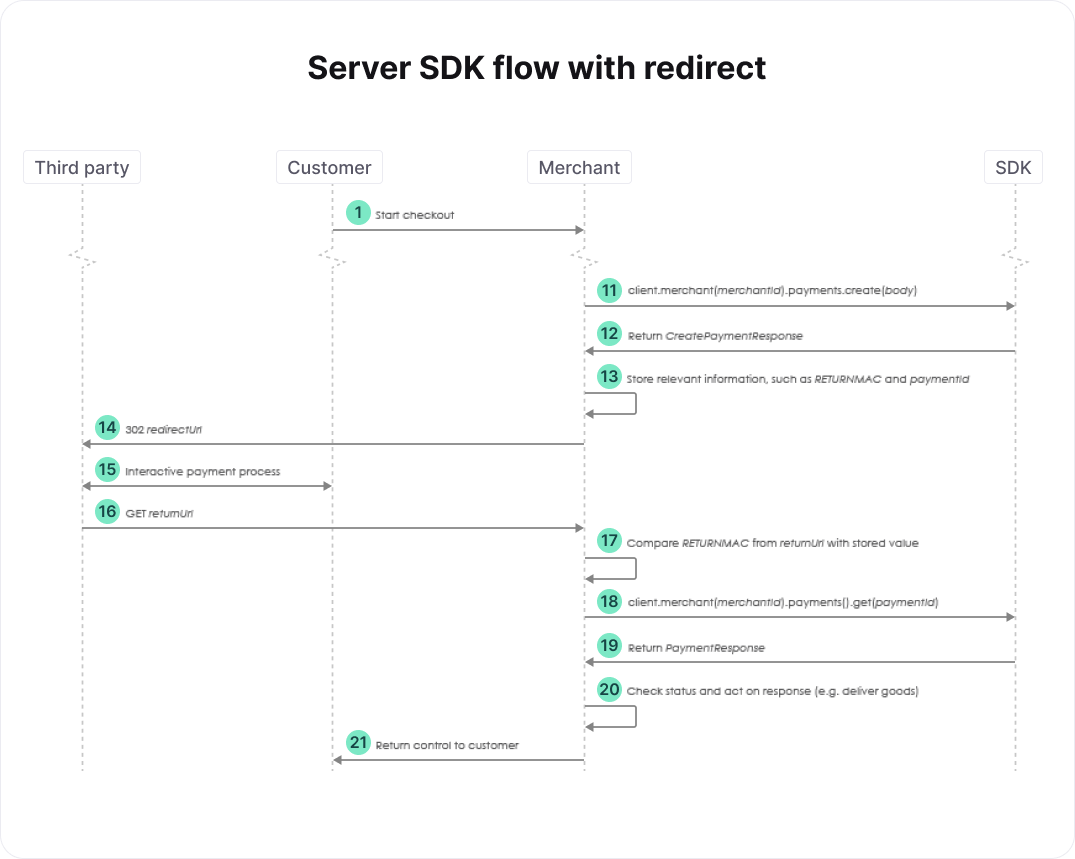
- We assume that we're dealing with a payment that involves a redirect. As mentioned above, this can be determined using the payment_product_id. Create a CreatePaymentRequest body and populate at least its order. Additionally, populate its redirect_payment_method_specificInput by providing at least the desired return_url. The return_url defines the location to which the customer should be redirected after completing the payment process. See the relevant section of the full API reference for more details.
- The create payment SDK call returns a CreatePaymentResponse response. For payments involving a redirect, response.merchant_action.redirect_data.redirect_url defines the URL to which the customer should be redirected to complete the payment. You need to store the value ofresponse.merchant_action.redirect_data.returnmac because it should be compared with theRETURNMAC returned by the third party at a later stage. Additionally, you need to store the value ofresponse.payment.id. This payment_id is needed to check the status of the payment after the redirect.
- Redirect the customer to the redirectUrl.
- After the payment process is completed, your customer is redirected to the return_url specified previously. In the flow shown in the figure above, we assume that this URL brings the customer back to your server.
- Retrieve the RETURNMAC provided by the third party from the return_url. You can use the RETURNMAC to identify the customer by comparing it with the one stored previously, and to validate that the customer was redirected to you by our systems.
- Use the payment_id stored previously to check the status of the payment. See the relevant section of the full API reference for more details. The retrieve payment SDK call returns a PaymentResponse response. The status of the payment is accessible via response.payment.status. Use this status to handle the order appropriately, as described above.
File Service support
Uploading files
To upload a file, you need to create an instance of class UploadableFile as part of your request. This class encapsulates the following properties:
- The name of the file (without any path).
- The content of the file. This can be a one of the following:
- A file descriptor
- A string
- An io.BytesIO object
If you open a file, you must make sure this file is closed after the upload call has finished. The SDK will not close it for you.
- The content type, e.g. application/pdf. Please check the API references for the allowed formats. You can find an incomplete list of content types (also called MIME types) here .
- Optionally, the content length (the size of the file).
Downloading files
When downloading a file, the response is yielded as a tuple with the following content:
- A list of response headers. These should include at least the Content-Type and Content-Disposition headers. You can use functions get_header_value and get_disposition_filename (from module worldline.connect.sdk.communication.response_header) to extract the content type and the name of the downloaded file.
- The content of the file, as a sequence of body chunks. You can loop over it and copy the chunks to any destination you like, e.g. a file on disk or a database record..
Idempotent requests
To execute a request as an idempotent request, you can call the same method as for a non-idempotent request, but with an extra CallContext argument with its idempotence_key property set. This will make sure the SDK will send an X-GCS-Idempotence-Key header with the idempotence key as its value.
If a subsequent request is sent with the same idempotence key, the response will contain an X-GCS-Idempotence-Request-Timestamp header, and the SDK will set the idempotence_request_timestamp property of the CallContext argument. If the first request has not finished yet, the RESTful Server API will return a 409 status code. If this occurs, the SDK will raise an IdempotenceException with the original idempotence key and the idempotence request timestamp.
For example:
context = CallContext(idempotence_key)
try:
    reponse = client.v1().merchants(merchant_id).payments().create(request, context)
except IdempotenceException as e:
    pass
    # a request with the same idempotence_key is still in progress, try again after a short pause
    # e.idempotence_request_timestamp contains the value of the
    # X-GCS-Idempotence-Request-Timestamp header
finally:
    idempotence_request_timestamp = context.idempotence_request_timestamp
    # idempotence_request_timestamp contains the value of the
    # X-GCS-Idempotence-Request-Timestamp header
# if idempotence_request_timestamp is not None this was not the first requestExceptions
Payment exceptions
If a payment attempt is declined by the RESTful Server API, a DeclinedPaymentException is raised. This exception contains a reference to the payment result which can be inspected to find the reason why the payment attempt was declined. This payment result can also be used to later retrieve the payment attempt again.
For example:
try:
    response = client.v1().merchants(merchant_id).payments().create(request)
except DeclinedPaymentException as e:
    payment = e.create_payment_result.payment
    payment_id = payment.id
    payment_status = payment.status
    sys.stderr.write("Payment " + payment_id + " was declined with status " + payment_status)
Unlike direct payments, indirect payments like iDeal and PayPal usually will not cause a DeclinedPaymentException to be raised, but instead will result in a CreatePaymentResponse return value. To determine if the payment was successfully finished, declined or cancelled, you would need to retrieve the payment status and examine its contents, especially the status field. It is recommended to use shared code for handling errors.
For example:
payment_id = None
try:
    response = client.v1().merchants(merchant_id).payments().create(request)
    payment_id = respons.payment.id
except DeclinedPaymentException as e:
    payment = e.create_payment_result.payment
    self.handle_payment_error(payment)
    return
# other code
payment = client.v1().merchants(merchant_id).payments().get(payment_id)
if is_not_successful(payment):
    self.handle_payment_error(payment)
Payout exceptions
If a payout attempt is declined by the RESTful Server API, a DeclinedPayoutException is raised. This exception contains a reference to the payout result which can be inspected to find the reason why the payout attempt was declined. This payout result can also be used to later retrieve the payout attempt again.
For example:
try:
    response = client.v1().merchants(merchant_id).payouts().create(request)
except DeclinedPayoutException as e:
    payout = e.payout_result
    payout_id = payout.id
    payout_status = payout.status
    sys.stderr.write("Payout " + payout_id + " was declined with status " + payout_status)
Refund exceptions
If a refund attempt is declined by the RESTful Server API, a DeclinedRefundException is raised. This exception contains a reference to the refund result which can be inspected to find the reason why the refund was declined. This refund result can also be used to later retrieve the refund attempt again.
For example:
try:
    response = client.v1().merchants(merchant_id).payments().refund(payment_id, request)
except DeclinedRefundException as e:
    refund = e.refund_result
    refund_id = refund.id
    refund _status = refund.status
    sys.stderr.write("Refund " + refund_id + " was declined with status " + refund_status)
Other exceptions
Besides from the above exceptions, all calls can raise one of the following runtime exceptions:
- A ValidationException if the request was not correct and couldn't be processed (HTTP status code 400)
- An AuthorizationException if the request was not allowed (HTTP status code 403)
- An IdempotenceException if an idempotent request caused a conflict (HTTP status code 409)
- A ReferenceException if an object was attempted to be referenced that doesn't exist or has been removed, or there was a conflict (HTTP status code 404, 409 or 410)
- A PlatformException if something went wrong on the Worldline platform. The Worldline platform was unable to process a message from a downstream partner/acquirer, or the service that you're trying to reach is temporary unavailable (HTTP status code 500, 502 or 503)
- An ApiException if the RESTful Server API returned any other error
A payment attempt can now be handled as follows:
try:
    response = client.v1().merchants(merchant_id).payments().create(request)
except DeclinedPaymentException as e:
    payment = e.get_create_payment_result().payment
    payment_id = payment.id
    payment_status = payment.status
    sys.stderr.write("Payment " + payment_id + " was declined with status " + payment_status)
except ValidationException as e:
    sys.stderr.write("Input validation error:")
    for error in e.errors:
        if error.property_name is None:
            sys.stderr.write("- " + error.code + ": " + error.message)
        else:
            sys.stderr.write("- " + error.property_name + ": " + error.code + ": " + error.message)
except AuthorizationException as e:
    sys.stderr.write("Authorization error:")
    for error in e.errors:
        sys.stderr.write("- " + error.code + ": " + error.message)
except ReferenceException as e:
    sys.stderr.write("Incorrect object reference:")
    for error in e.errors:
        sys.stderr.write("- " + error.code + ": " + error.message)
except PlatformException as e:
    sys.stderr.write("Error occurred at Worldline or a downstream partner/acquirer:")
    for error in e.errors:
        sys.stderr.write("- " + error.code + ": " + error.message)
except ApiException as e:
    sys.stderr.write("Worldline error:")
    for error in e.errors:
        sys.stderr.write("- " + error.code + ": " + error.message)
Exception overview
The following table is a summary that shows when each of these exceptions will be raised:
| HTTP status code | Meaning | Description | Exception Type |
|---|---|---|---|
| 200 | Successful | Your request was processed correctly | N/A |
| 201 | Created | Your request was processed correctly and a new resource was created. The URI of this created resource is returned in the Location header of the response. |
N/A |
| 204 | No Content | Your request was processed correctly | N/A |
| various; CreatePaymentResult is present in the response | Payment Rejected | Your request was rejected either by the Worldline platform or one of our downstream partners/acquirers. | DeclinedPaymentException |
| various; PayoutResult is present in the response | Payout Rejected | Your request was rejected either by the Worldline platform or one of our downstream partners/acquirers. | DeclinedPayoutException |
| various; RefundResult is present in the response | Refund Rejected | Your request was rejected either by the Worldline platform or one of our downstream partners/acquirers. | DeclinedRefundException |
| 400 | Bad Request | Your request is not correct and can't be processed. Please correct the mistake and try again. | ValidationException |
| 403 | Not Authorized | You're trying to do something that is not allowed or that you're not authorized to do. | AuthorizationException |
| 404 | Not Found | The object you were trying to access could not be found on the server. | ReferenceException |
| 409 | Conflict | Your idempotent request resulted in a conflict. The first request has not finished yet. | IdempotenceException |
| 409 | Conflict | Your request resulted in a conflict. Either you submitted a duplicate request or you're trying to create something with a duplicate key. | ReferenceException |
| 410 | Gone | The object that you are trying to reach has been removed. | ReferenceException |
| 500 | Internal Server Error | Something went wrong on the Worldline platform. | PlatformException |
| 502 | Bad Gateway | The Worldline platform was unable to process a message from a downstream partner/acquirer. | PlatformException |
| 503 | Service Unavailable | The service that you're trying to reach is temporary unavailable. Please try again later. |
PlatformException |
| other | Unexpected error | An unexpected error has occurred | ApiException |
Logging
The Python SDK supports logging of requests, responses and exceptions of the API communication.
In order to start using the logging feature, an implementation of the CommunicatorLogger interface should be provided. The SDK provides two example implementations for logging to sys.stdout (SysOutCommunicatorLogger) and logging to a logger (PythonCommunicatorLogger).
Logging can be enabled by calling the enable_logging method on a Client object, and providing the logger as an argument. The logger can subsequently be disabled by calling the disable_logging method.
When logged messages contain sensitive data, this data is obfuscated.
The following code exemplifies the use of adding a logger:
client = Factory.create_client_from_file(configuration_file_name, "api_key_id", "secret_api_key")
logger = PythonCommunicatorLogger(logging.get_logger(...), 800)
client.enable_logging(logger)
# ... Do some calls
client.disable_logging()
Advanced use: Connection pooling
A Client created using the Factory class from a properties file or CommunicatorConfiguration object will use its own connection pool. If multiple clients should share a single connection pool, the Factory class should be used to first create a shared Communicator, then to create Client instances that use that Communicator:
communicator = Factory.create_communicator(configuration_file_name, "api_key_id", "secret_api_key")
client = Factory.create_client_from_communicator(communicator)
Instead of closing these Client instances, you should instead close the Communicator when it is no longer needed. This will close all Client instances that use the Communicator.
If instead one of the Client instances is closed, the Communicator will be closed as well. As a result, all other Client instances that use the Communicator will also be closed. Attempting to use a closed Client or Communicator will result in an error.
Just like Client, Communicator defines __enter__ and __exit__ methods, and can therefore also be used in with statements.
Connection management
Just like Client, Communicator also has method close_expired_connections that can be used to evict expired HTTP connections. You can call this method on the Communicator instead of on any of the Client instances. The effect will be the same.
Advanced use: Customization of the communication
A Client uses a Communicator to communicate with the RESTful Server API. A Communicator contains all the logic to transform a request object to a HTTP request and a HTTP response to a response object. If needed, you can extend this class. To instantiate a Client that uses your own implementation of Communicator you can use the following code snippet:
communicator = YourCommunicator()
client = Factory.create_client_from_communicator(communicator)
However, for most customizations you do not have to extend Communicator. The functionality of the Communicator is built on the following:
- The RESTful Server API endpoint URI.
- A Connection, which represents one or more HTTP connections to the Worldline server.
- An Authenticator, which is used to sign your requests.
- A MetadataProvider, which constructs the header with metadata of your server that is sent in requests for BI and fraud prevention purposes.
- A Marshaller, which is used to marshal and unmarshal request and response objects to and from JSON.
For your convenience, the Factory.create_communicator_from_configuration, Factory.create_communicator_from_file, Factory.create_client_from_configuration and Factory.create_client_from_file methods can take optional arguments to set the Connection, Authenticator, MetadataProvider or Marshaller components. For example, the following code snippet:
connection = YourConnection()
client = Factory.create_client_from_file(configuration_file_name, "api_key_id", "secret_api_key",
                                         connection = connection)
Connection management
Calling close_expired_connections on a Client or a Communicator object only works if the Connection extends PooledConnection, otherwise these methods do nothing. If you write a custom Connection that uses a pool of HTTP connections, extend PooledConnection instead.
Logging
To facilitate implementing logging in a custom Connection, the SDK provides utility classes RequestLogMessage and ResponseLogMessage. These can be used to easily construct request and response messages. For instance:
# In the below code, logger is the CommunicatorLogger set using enable_logging.
# Note that it may be None if enable_logging is not called.
request_id = uuid.uuid4()
request_log_message = RequestLogMessage(request_id, method, uri)
# add request headers to request_log_message
# if present, set the request body on request_log_message
logger.log(request_log_message.get_message())
start_time = time.time() * 1000
# send the request
end_time = time.time() * 1000
duration = end_time - start_time
status_code = ...
# note: duration is optional
response_log_message = ResponseLogMessage(request_id, status_code, duration)
# add response headers to response_log_message
# if present, set the response body on response_log_message
logger.log(response_log_message.get_message())
Webhooks
The part of the SDK that handles the webhooks support is called the webhooks helper. It transparently handles both validation of signatures against the event bodies sent by the webhooks system (including finding the secret key for key ids), and unmarshalling of these bodies to objects. This allows you to focus on the essentials, and not the additional overhead.
Providing secret keys
Secret keys are provided to the webhooks helper using implementations of interface SecretKeyStore. The Python SDK provides one implementation: InMemorySecretKeyStore. This will store secret keys in-memory. If more advanced storage is required, e.g. using a database or file system, then you should write your own implementation.
Initialization of the webhooks helper
Using an implementation of SecretKeyStore, create an instance of WebhooksHelper using our Webhooks class:
helper = Webhooks.v1().create_helper(secret_key_store)Use the webhooks helper
From an entrypoint that you should write yourself, call the unmarshal method of the WebhooksHelper object. It takes the following arguments:
- The body, as a string. This should be the raw body as received from the webhooks system.
- A list of request headers as received from the webhooks system.
In code:
event = helper.unmarshal(body, request_headers)Notes
Renaming of properties
The Python SDK uses Python naming conventions. As a result, properties have been turned into so-called Snake case . For example, hostedCheckoutSpecificInput is called hosted_checkout_specific_input, and RETURNMAC is called returnmac.